CLAIMS SUBMISSION
ETHIOPIAN NATIONAL HEALTH INSURANCE SYSTEM
User Manual and Training Guide
DOCUMENT CONTROL
Created on: 5 July, 2019
Last updated on: 23 October 2019
For updates and corrections, contact mailto:sysadmin@etnhis.org
ABOUT CLAIMS SUBMISSION
WHAT IS CLAIMS SUBMISSION?
Claims submission is a holistic term used for workflows that are carried out by the health service provider, it mainly includes claim member identification information, service provider information, and encounter/service information associated with the fee being requested by the provider to the payer/insurer for reimbursement.
CLAIM SUBMISSION IN ETNHIS
This manual is prepared for claim submitters, to help the user understand the android as well as web based claim submission module of the EtNHIS and use it as a guide, whenever reference is required. Although the application is designed and built to be user friendly, the user manual will make it even simpler by providing a description of each and every button on the platform along with a chronological flow of processes so that a user can understand each and every step associated with a process. Nearly all pages of the claim submission platform are captured in this manual and all functionalities associated with the module are also included. In order to have a visual understanding of the process flow, each description of the process is aligned with screenshots from the claim submission app. To have a good understanding of the process flow and the functionalities, users are expected to read the brief description of the process along with a screen shot of the application.
Please note that the claim submission app is available in android, primarily for use health center, and on the web, which is primarily meant for hospital use. The android app is capable of working even when there is no network as its programmed in such a way that the data entered offline is stored in the devices and automatically synch to the server when the connection resumes. Similarly the web app is also supports claim entry even when connection is interrupted as it leverages a latest technology called Progressive Web App (PWA). The PWA interface is exactly as the web app but with an offline capability in the same way the android app works.
On EtNHIS the claim submission process has three main steps. These are 1) member identification and validation of eligibility for services, 2) capturing/recording of claim/encounter information, 3) approval/authorization of the claim for submission by authorized user from the provider. To increase efficiency and accuracy the claim submission platform has a robust data validation feature in built in to the system. This inbuilt data validation feature is based on predefined rules and helps in preventing data entry errors, reduces data entry time and effort, and provides important input, in the form of alert or flagging, for claim adjudicator to guide the claim review and adjudication process. Some of the flags displayed for the adjudicator based on the data validation feature built in the submission app are the type of check in(manual vs automatic/system check in), the membership status of the beneficiary (expired or not), the referral status of the claim (whether the inbound referral is linked or not), etc. Although the system is meant for claim submission, it also has a feature/interface in to the claim adjudication & reimbursement web of the payer that gives the health facilities visibility about the status of the claims they submitted.
WHO ARE THE MAIN USERS?
The claim submission module will be used by all the responsible personnel in the health facility, mainly the facility reception who checks in patients/members, the claim clerk who enters the encounter/service details, and the facility director or his/her designee who approves submits the claim to the payer on behalf of the facility.
HOW WILL THIS APPLICATION HELP?
The Claims Submission application is available for users accessing it on the web and on android. Unless specifically mentioned, the term app is used to mean both the android app and the web app as both apps have very similar functionalities. In the rare cases where there is a difference between the web interface and android interface, a detailed description and screenshots of the interface is attached for both the Android and the web app.
You will log into the app using your user account credentials.
To access the android app, tap in the claim submission icon.
To access the web app, use the following link https://test.etnhis.org (for practice transactions) and https://etnhis.org (for actual transactions).
1. GETTING STARTED
The Claims Submission application can be accessed through the Android application installed on the phone.
1.1. To launch the application on your phone, click on the Claims Submission app icon

|
Fig 1.1: Claims Submission Application |
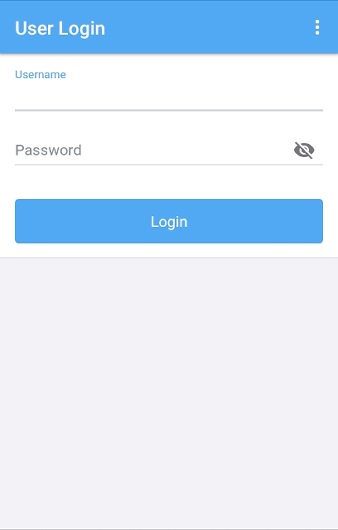
1.2. On launching the application for the first time, enter the username and password.
|
Fig 1.2: Login Screen |
HELP CORNER
If you do not have the application installed on your phone, please contact help desk – contact details provided on the last page of this manual.
To log in to the application, you need an active internet connection. If there is no Internet connection, please wait until the network connectivity resumes and try again.
Each user will be provided with a unique username and password. If you do not have user credentials, please get in touch with the help desk.
TIPS
Click on the eye icon to see the password being entered

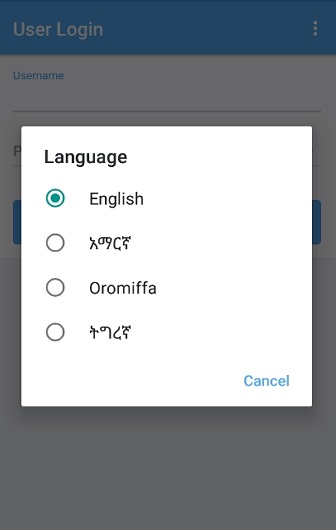
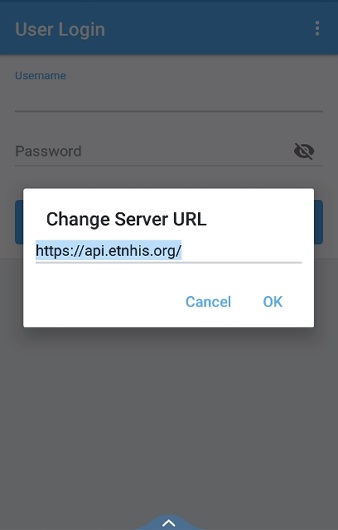
Click on the show menu button on the top right corner to change the language and server URL

|
Fig 1.3: Switch Language and Server URL |
After Selecting switch language, select the language you prefer from the popup dialog list.
|
Fig 1.3.1: Select Language |
After selecting change server URL, enter the new server URL. Make sure you start with http:// or https://.
|
Fig 1.3.2: Enter server URL |
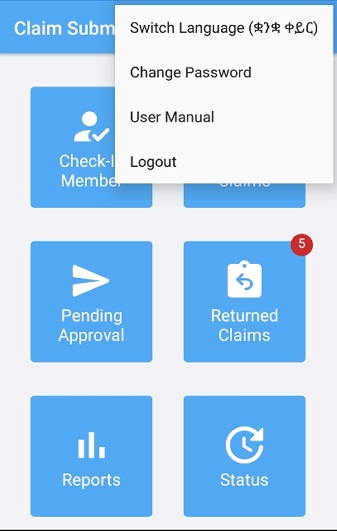
After successfully login, click on the three dot signs on the top right corner of the screen to switch language, to change password, to open user manual, or to logout.
|
Fig 1.4 : Option menu |
2. KNOWING YOUR HOME SCREEN
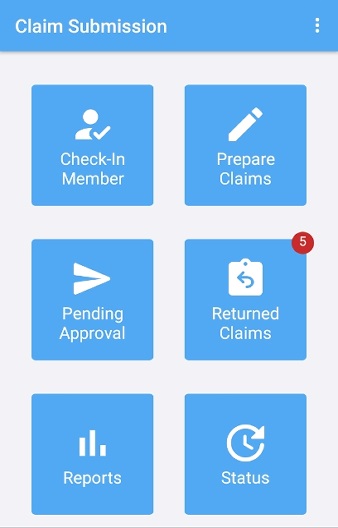
2.1. After completing login, the application will start on the Home Screen. When the application starts for the first time, your Home Screen will be like the following image:
|
Fig 2.1: Home Screen |
2.2. With the Check-In Member button, you can check in a member that has presented at the health facility for medical treatment. More details provided in Section 4 – Check in a Member.
2.3. With the Prepare Claim button, you can enter the information needed to submit a claim. More details are provided in Section 5 – Prepare a Claim.
2.4. With the Pending Approval button, you can review claims requiring facility head approval before being submitted. More details are provided in Section 6 – Facility Head Approval.
2.5. With the Returned Claims button, you can see a list of claims the adjudicator returned for additional review or changes. More details are provided in Section 7 – Resubmit a Returned Claim.
2.6. With the Switch Language button, you can change the language used in the app.
2.7. With the Status button, you can see the status of the server sync and last sync time. More details are provided in Section 7 – Technical Support.
3. IDENTIFY A MEMBER
To identify a member using the Android app, you will use one of four available search options: (1) scanning a QR code, (2) search by CBHI ID, (3) search by Local CBHI ID, or (4) search by name.
3.1. Scanning a QR code
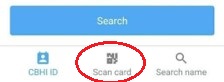
Select the Scan card option at the bottom of the screen.
|
Fig 3.1.1: Scan Card |
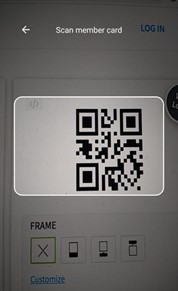
The application will access the phone’s camera and a window will appear. Center the window over the QR code to scan it.
|
Fig 3.1.2: Scanning QR Code |
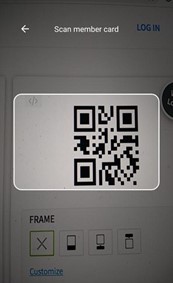
If the scan is successful, the member and any beneficiaries associated with the QR code will appear in a list of search results.
|
Fig 3.1.3: Search Results |
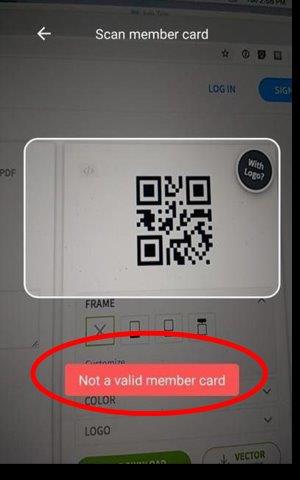
If the scan is unsuccessful, a “Not a valid member card” message will appear. You will need to try a different member search method
|
Fig 3.1.4: Scanning QR Code |
3.2. Search for a member by CBHI ID
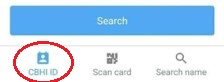
Select the CBHI ID option at the bottom of the screen.
|
Fig 3.2.1: CBHI ID |
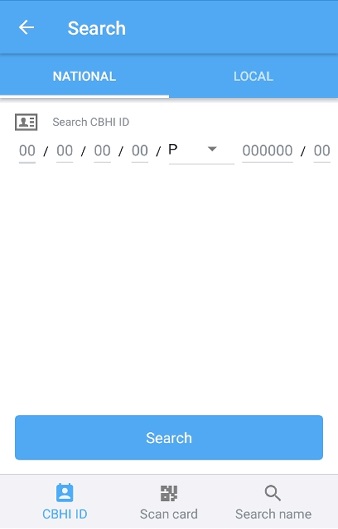
You have two options to use, national and local CBHI ID search options.
|
Fig 3.2.1: CBHI ID |
If the search is successful, the member and any beneficiaries associated with the QR code will appear in a list of search results.
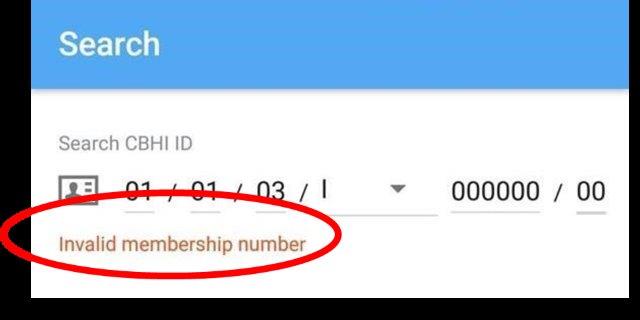
If you search an invalid CBHI ID, the system will notify you the number is invalid.
|
Fig 3.2.2: Invalid Membership Number |
3.3. Search for a member by name
Select the Search name option at the bottom of the screen.
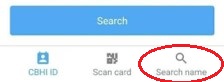
|
Fig 3.3: Search name |
Type the full or partial member name into the search box.
Based on what you searched, the system will return results of potential matches.
If no results match the search terms, the system will not return any matches.
Member Identification on Web app
To identify a member using the web app, you will use one of four available search options: (1) search by CBHI ID, (2) search by QR code, (3) search by MRN, or (4) advanced search.
Below is the member identification & check in screen in the Web App
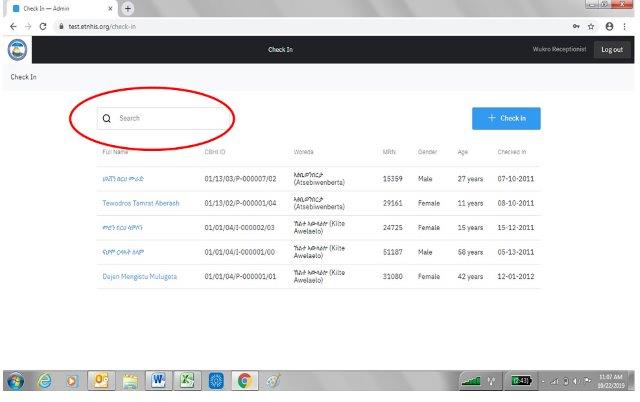
|
Member Identification on Web app |
3.4. Search for a member by CBHI ID
Use the + check in button to open up the search options.
Within the CBHI ID tab, type the CBHI ID into the search box.
Click the Search button.
If the CBHI ID matches an existing member, the search will return a result.
If the CBHI ID does not match a valid member, you will be given the option to proceed with a manual check in. You may also try another CBHI ID or search option.
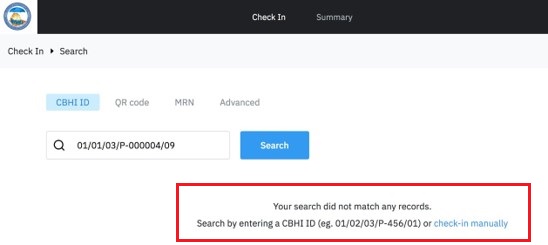
|
Fig 3.4: Invalid CBHI ID Search |
3.5. Search for a member by QR code
Use the + Check In button to open up the search options.
Within the QR code tab, type the QR code into the search box.
Click the Search button.
If the QR code matches an existing member, the search will return a result.
If the QR code does not match a valid member, your search will not return results. You may try another QR code or search option.
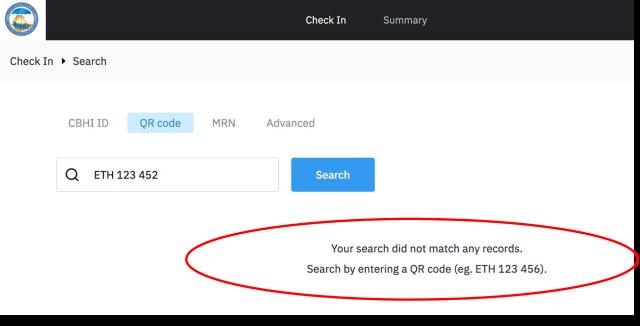
|
Fig 3.5: Invalid QR Code Search |
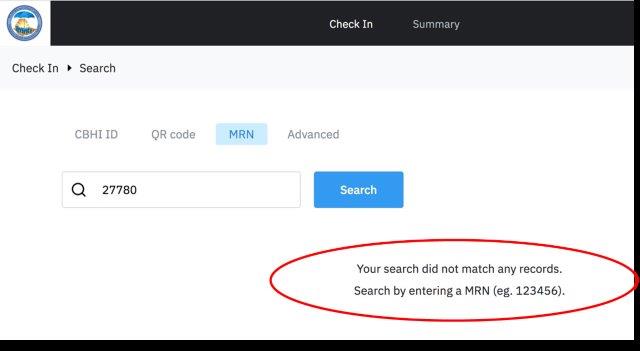
3.6. Search for a member by MRN
Use the + Check In button to open up the search options.
Within the MRN tab, type the MRN number into the search box.
Click the Search button.
If the MRN matches an existing member, the search will return a result.
If the MRN does not match a valid member, your search will not return results. You may try another MRN or search option.
|
Fig 3.6: Invalid MRN Search |
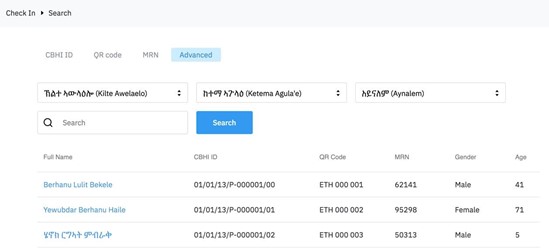
3.7. Advanced search by name or region, woreda, Kebelle, or Gote
Use the + Check In button to open up the search options.
Within the Advanced tab, choose the region, woreda, Kebelle, or Gote as applicable. Click the Search button. This will return a list of results filtered by the geographic areas you have selected.
Alternatively, you may enter the member name into the search box. For best results, you should include all three names of the person. Click the Search button.
Based on your search, you may find the member you are looking for in the list. If you do not, you may try another advanced search or a different search option.
|
Fig 3.7: Advanced Search Results |
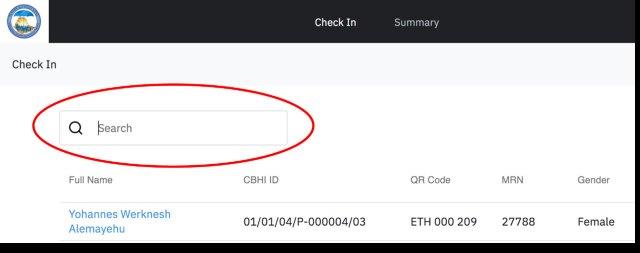
3.8. If you’re looking for a member who has already been checked in, then you can use the search box on the Check In tab to search for a member in the Check In list using CBHI ID, QR code, or MRN.
|
Fig 3.8: Search Check In List |
4. CHECK IN A MEMBER
Once you have searched for and found a member in the Android app, you can check in the member. While checking in the member on the Android app, you have some options to document information. Section 4.1 below provides an overview of the steps.
4.1. Checking in a member on the Android app
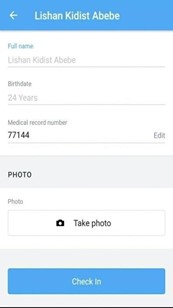
After searching for and identifying the member, you begin the check in process by selecting the member you wish to check in. When you select the member, you can view and edit some of the member details.
|
Fig 4.1.1: View Member Details |
Within the member details, you can view member information.
You can edit the MRN if needed.
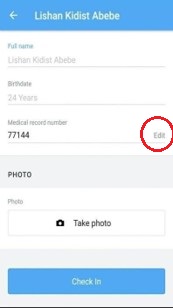
|
Fig 4.1.2: Edit MRN |
Within the member details, you can also take a photo or change an existing photo.
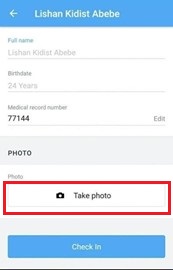
|
Fig 4.1.3: Take Photo |
After viewing and editing member details, you finish the check in process by using the Check In button at the bottom of the screen.
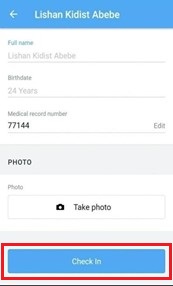
|
Fig 4.1.4: Check In |
Once you have searched for and found a member in the web app, you can check in the member. While checking in the member on the web app, you have some options to document information. Section 4.2 below provide an overview of the steps.
4.2. Checking in a member on the web app
After searching for and identifying the member, you begin the check in process by selecting the member you wish to check in. When you select the member, you can view and edit some of the member details.
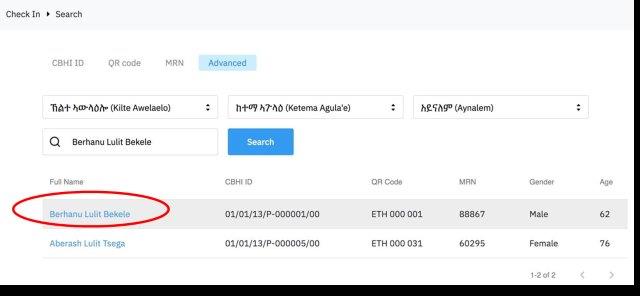
|
Fig 4.2.1: Select Member |
Within the member details, you can view member information.
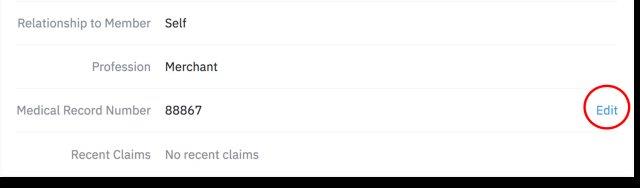
You can edit the MRN if needed.
Please note that entering/having MRN is required to check-in a patient
|
Fig 4.2.2: Select Member |
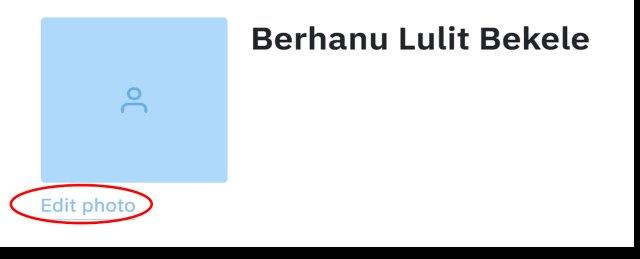
You can also upload a new photo if needed.
|
Fig 4.2.3: Edit Photo |
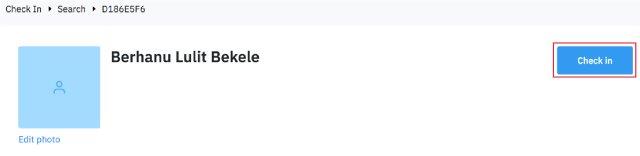
After viewing and editing member details, you continue the check in process by using the Check In button at the right.
|
Fig 4.2.4: Continue Check In |
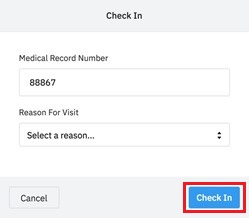
Enter the MRN and Reason For Visit. Then, you can complete the check in process using the Check In button.
|
Fig 4.2.5: Finish Check In |
If you’re unable to find a member and you believe the membership is valid, you have the option of manually checking in a member.
4.3. Manually checking in a member on the Android app
To manually check in a member in the Android app, you must first attempt a CBHI ID search. When the CBHI ID returns as invalid, you are given an option to manually check in the member.
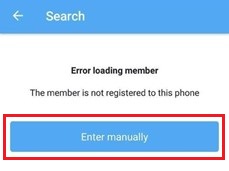
|
Fig 4.3.1: Selecting Manual Check In |
Enter the information on the screen, and then use the Check In button at the bottom to check in the member.
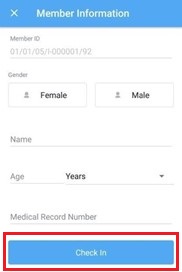
|
Fig 4.3.2: Manually Checking In a Member |
4.4. Manually checking in a member on the web app
To manually check in a member in the web app, you must first attempt a CBHI ID search. When the CBHI ID returns as invalid, you are given an option to manually check in the member.
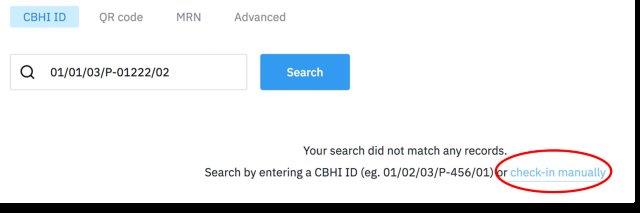
|
Fig 4.4.1: Selecting Manual Check In |
Enter the information on the screen, and then use the Check In button at the bottom to check in the member
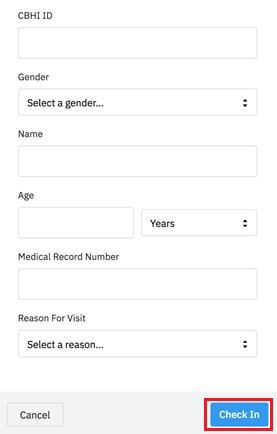
|
Fig 4.4.2: Manually Checking In a Member |
4.5. Dismissing a checked-in member on the Android app
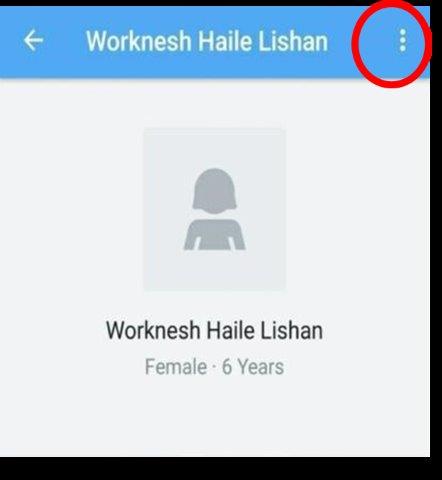
To dismiss a member, find the member on the checked-in list.
Select the member to open the member details.
Use the menu at the top right to open the Remove option. Click Remove.
|
Fig 4.5: Dismissing a Checked-In Member (Android) |
4.6. Dismissing a checked-in member on the web app
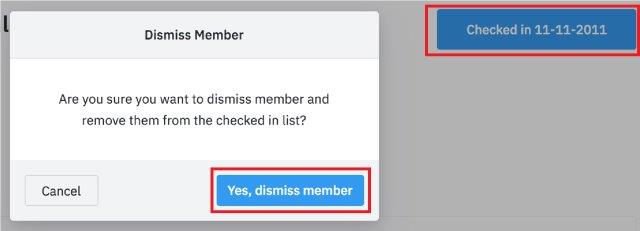
To dismiss a member, find the member on the checked-in list.
Select the member to open the member details.
Use the Checked-in button at the right to open a confirmation window. Then use the Yes, dismiss member button to remove the member from the checked-in list.
|
Fig 4.6: Dismissing a Checked-In Member (Web) |
5. PREPARE A CLAIM
Once you have checked in a member in the Android app, the member will show up on the checked in list and you can start the process of preparing a claim for that member at any time.
5.1. Start preparing a claim on the Android app
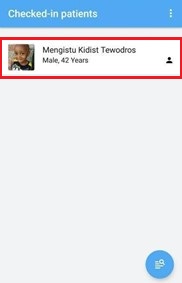
Use the Prepare Claim button at in the home screen
Find the member in the checked in list.
|
Fig 5.1.1: Find Member in Checked-in List (Android) |
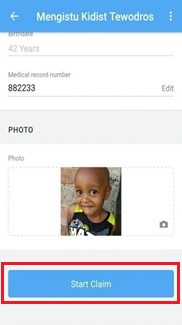
Select the member to open the member details.
Use the Start Claim button at the bottom of the screen to begin the process of preparing a claim.
|
Fig 5.1.2: Start Claim (Android) |
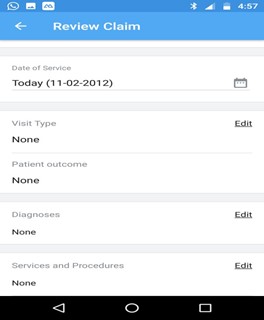
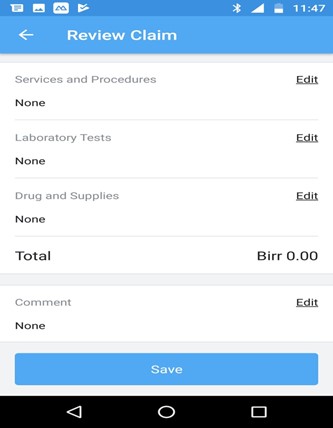
5.2. Entering claim information in the Android app: Entering encounter/claim information step by step
|
|
Entering Date of service: date of service defaults to the current date but if you want to change it tab in the ‘Date of Service’ tab and select the appropriate date of service from the calendar table
Entering visit type: select the applicable visit type from the drop down list by pressing the ‘Edit’ sign next to the ‘Visit Type’ field.
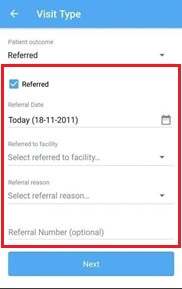
Entering Patient Outcome: select the applicable patient outcome from the drop down menu by pressing the ‘Edit’ tab next to ‘Visit type’ tab. If the patient outcome is ‘Referred’, you will be required to enter the referral date, the name of the receiving facility, and the reason for referral. To enter the referral date press, and select the applicable date from the calendar table. To Enter the name of the receiving facility, press the referred to tab and select the name of the applicable facility from the drop down list. To Enter referral reason, press the ‘referral reason’ tab and select the applicable reason from the drop down list. If the patient outcome is appointment for follow up, select ‘follow up’ and enter the applicable follow up date from the calendar table
|
Fig 5.2.2: Patient outcome & Referral Information (Android) |
Once you have entered all the relevant information on this screen, press ‘Done’ button to go to the claim entry home page, named ‘Review Screen’
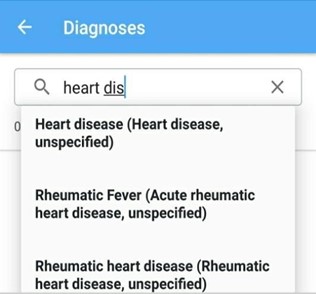
To enter Diagnoses information, press ‘Edit’ button next to the Diagnoses tab and type the name of the applicable diagnoses in the search box and select the relevant diagnoses from the (NCoD) list.
|
Fig 5.2.3: Diagnoses (Android) |
Once you have entered all the relevant information on this screen, press Done button to go to the Review Screen page and fill the next data field applicable
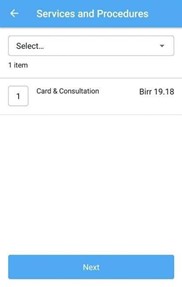
To Services and Procedures screen, press ‘Edit’ button next to the Services and Procedures tab and select relevant services and procedures using the drop-down list. The Services and Procedures tab is used to enter all services and procedures, except lab/imaging and drugs, provided to the patient. You can edit/change the quantity of a particular service provided by pressing and typing the correct quantity. Please note that each item in the dropdown list has a facility specific fee and the fee is edited by the system admins only. To change/edit the list of services or the associated fee, contact help desk.
|
Fig 5.2.4: Services and Procedures (Android) |
Once you have entered all the relevant information on this screen, press Done button to go to the review screen.
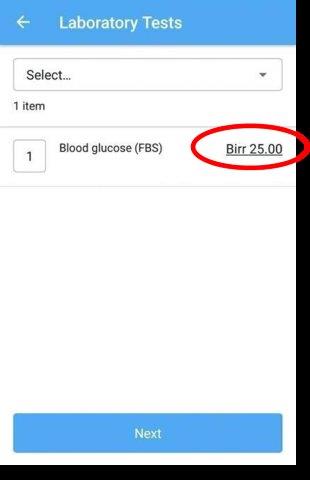
To enter Laboratory Tests, press the ‘Edit’ button next to the “laboratory Tests’ tab and select relevant lab tests using the drop-down list.
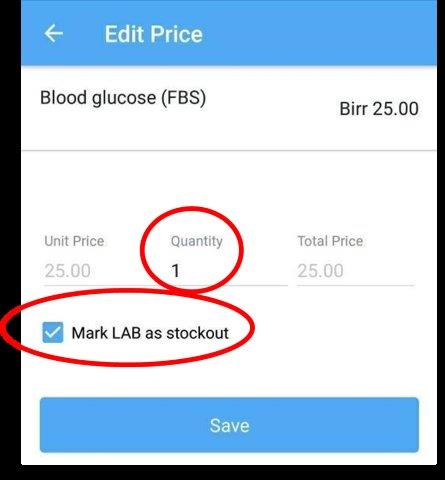
To edit the quantity or/and fee of a lab test or to indicate a stock out, tab the hyperlink (or the price tab) to the left of the billable name. To edit the quantity only, you can also use the box to the left of the billable name.
Marking a stock out: stock out is a situation where a particular service is ordered or prescribed by the clinician but isn’t provided by the facility
|
Fig 5.2.5: Laboratory Tests (Android) |
On the Edit Price screen, you can enter a new quantity or indicate a stock out by using the Mark LAB as stock out checkbox.
|
Fig 5.2.6: Edit Lab (Android) |
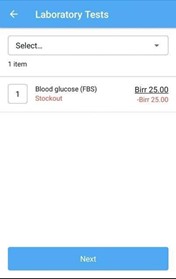
After you finish, click the Save button. You will be taken back to the Laboratory Tests screen.
|
Fig 5.2.7: Lab Stock out (Android) |
Once you have entered all the relevant information on this screen, press Done button to the claim review screen.
To enter Drug and Supplies, tab the ‘Edit’ tab next to the ‘Drug and Supplies’ field and enter any relevant drugs and supplies using the search box.
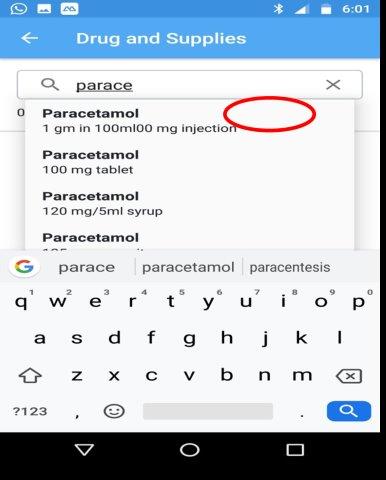
|
Fig 5.2.8: Drug and Supplies (Android) |
To edit the quantity, price, or to indicate a stock out, use the hyperlink to open the Edit Price screen. To edit the quantity only, you can also use the box to the left of the billable name.
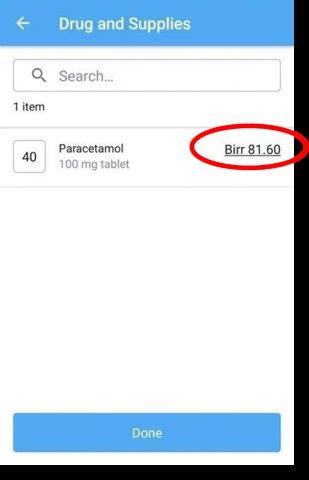
|
Fig 5.2.8: Drug and Supplies (Android) |
On the Edit Price screen, you can enter a different quantity, unit price, or total price. You can also indicate a stock out by using the Mark DRUG as stock out checkbox.
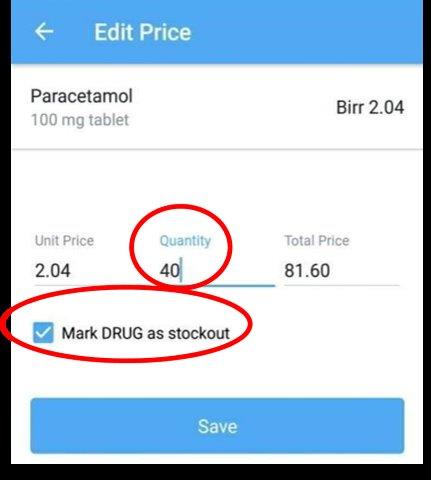
|
Fig 5.2.9: Edit Drug (Android) |
After you finish, click the Save button. You will be taken back to the Drug and Supplies screen.
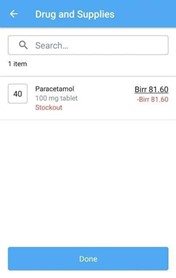
|
Fig 5.2.10: Drug Stock out (Android) |
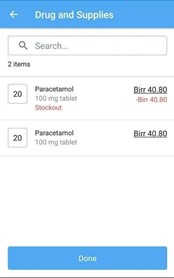
If you need to document a partial stock out, you can do so by entering two lines for the same drug. One line will represent the quantity dispensed. The other (the stock out) will represent the quantity not dispensed.
|
Fig 5.2.11: Drug Partial Stock out (Android) |
Once you have entered all the relevant information on this screen, use the Done button at the bottom of the screen to proceed.
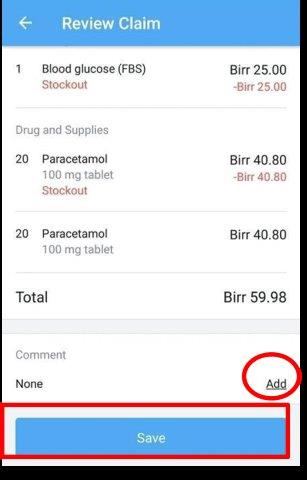
You will be taken to the Review Claim screen.
Once you have reviewed the claim information, you may add a comment (optional) if you wish and use the Save button to finish preparing the claim.
|
Fig 5.2.12: Claim Review (Android) |
Multiple selection: if you want a multiple selection from a particular drop down list, say, diagnosis list or service list or lab list or drug list, just press the relevant tab and press the applicable option from the drop down list.
Deletion: if you want to delete a particular procedure, or lab or imaging or drug you selected from the respective drop-down lists, swipe left the item you want to delete and press ‘yes’ to confirm deletion.
Claim submission using the Web App:
Once you have checked in a member in the web app, you can start the process of preparing a claim for that member at any time. You can also enter a claim without a check-in member.
5.3. Preparing a claim for a checked-in member on the web app
|
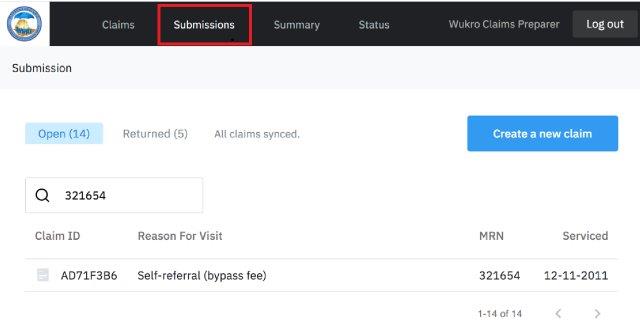
Fig 5.3.1: Claim submission screen (Web) |
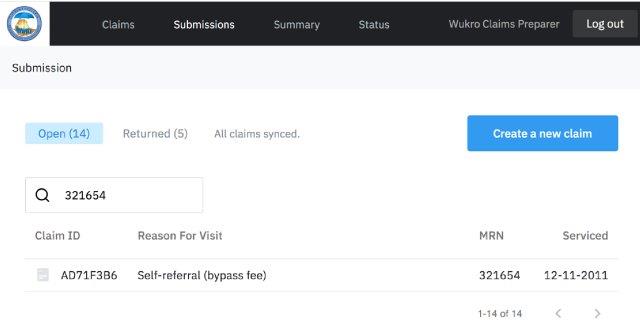
On the Submission screen, locate the member’s claim you wish to prepare using the search box or by scrolling through the list.
|
Fig 5.3.1: Find Member in Submission List (Web) |
5.4. Entering claim information in the web app
After you open the claim details, review the existing information and then proceed with entering the remaining claim information.
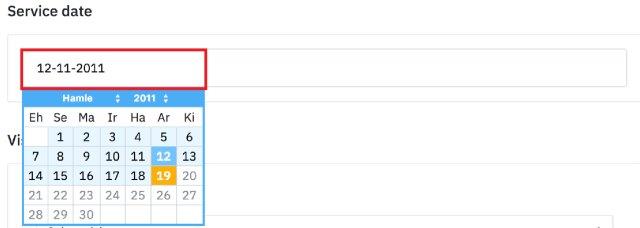
In the Service Date section, update the Service Date using the date selector (if needed). By default, the Service Date will be the check-in date.
|
Fig 5.4.1: Service Date (Web) |
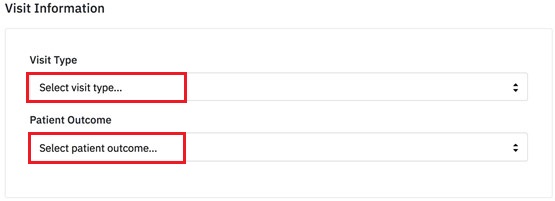
In the Visit Information section, enter the visit type and patient outcome.
|
Fig 5.4.2: Visit Information (Web) |
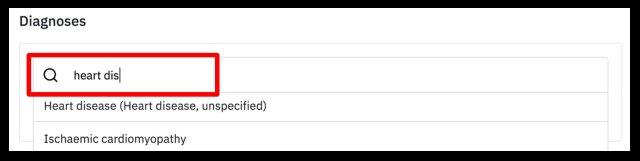
In the Diagnoses section, enter any relevant diagnoses using the search box.
|
Fig 5.4.3: Diagnoses (Web) |
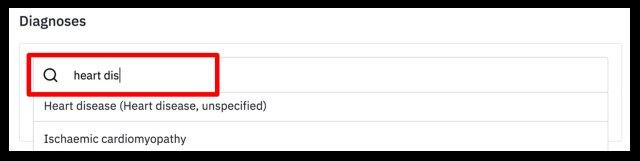
In the Services section, enter any services using the drop-down list in the Service subsection. Adjust the quantity as needed.
|
Fig 5.4.4: Service (Web) |
In the Lab sub-section, enter any lab tests using the drop-down list. Adjust the quantity as needed.
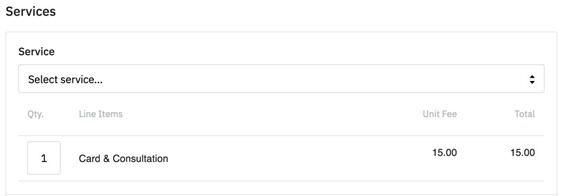
|
Fig 5.4.5: Lab (Web) |
To edit either the price, the quantity, indicate a stock out, or delete a lab test, select the test to open the Edit Fee window.
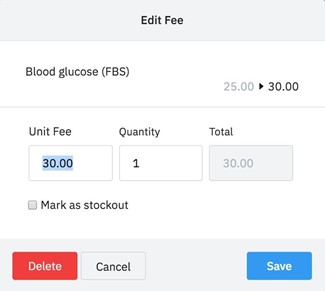
|
Fig 5.4.6: Lab Edit Fee (Web) |
In the Edit Fee window, you can use the Mark as stock out checkbox to indicate a stock out. After you finish making edits, use the Save button to save your changes.
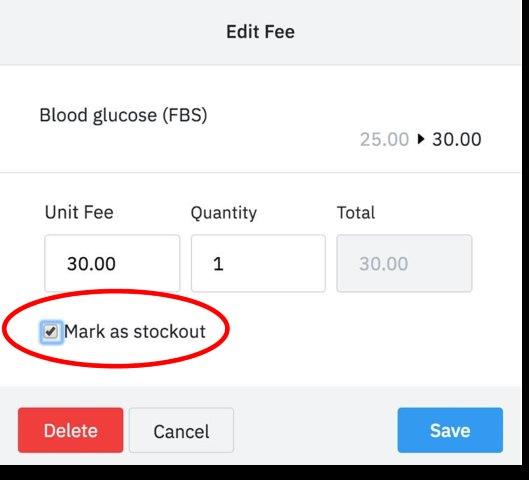
|
Fig 5.4.7: Lab Stock out (Web) |
Your changes will be reflected in the claim details.
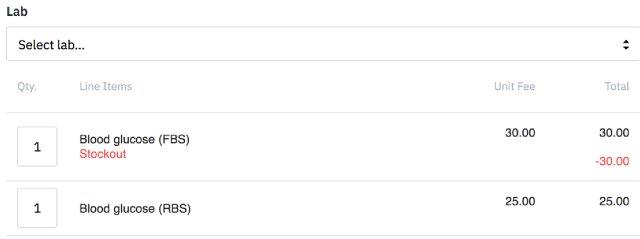
|
Fig 5.4.8: Lab Details (Web) |
In the Drug and supply sub-section, enter any drugs and supplies using the search box. Adjust the quantity as needed.
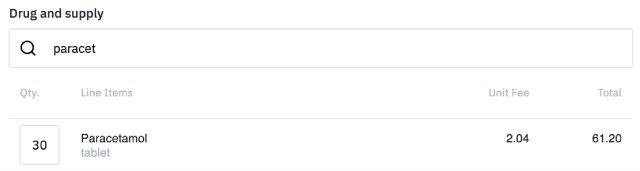
|
Fig 5.4.9: Drug and Supply (Web) |
To edit either the price, the quantity, indicate a stock out, or delete a drug or supply, select the billable item to open the Edit Fee window.
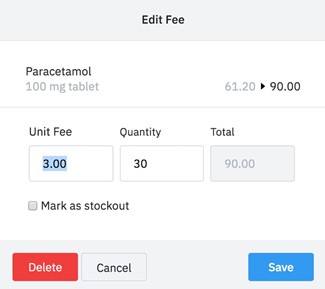
|
Fig 5.4.10: Drug Edit Fee (Web) |
In the Edit Fee window, you can use the Mark as stock out checkbox to indicate a stock out. After you finish making edits, use the Save button to save your changes.
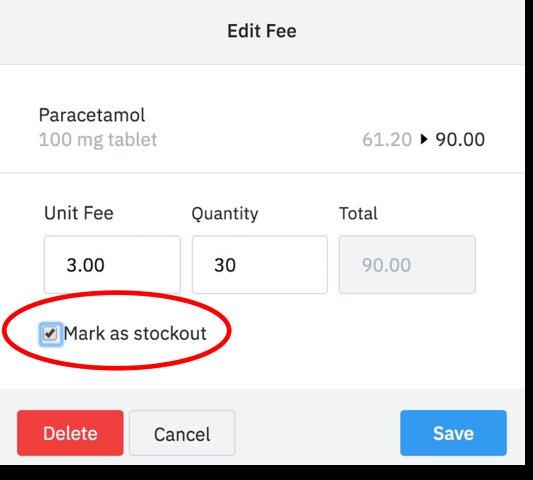
|
Fig 5.4.11: Drug Stock out (Web) |
If you need to document a partial stock out, you can do so by entering two lines for the same drug. One line will represent the quantity dispensed. The other (the stock out) will represent the quantity not dispensed.
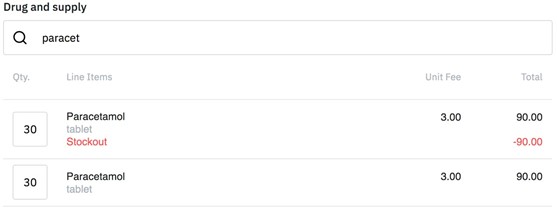
|
Fig 5.4.12: Drug Partial Stock out (Web) |
In the Imaging sub-section, enter any Imaging procedures using the drop-down list.
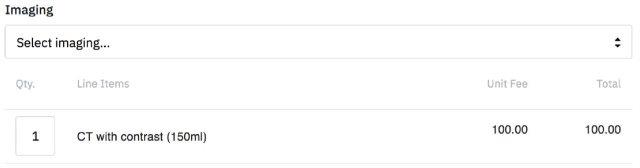
|
Fig 5.4.13: Imaging (Web) |
To edit either the price, the quantity or to delete an imaging procedure, select the billable item to open the Edit Fee window.
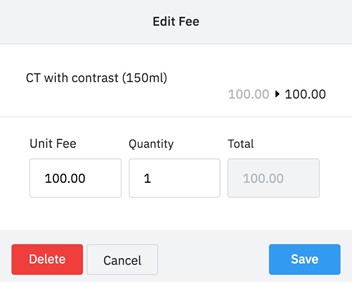
|
Fig 5.4.14: Imaging Edit Fee (Web) |
In the Bed Day sub-section, enter any Imaging procedures using the drop-down list.
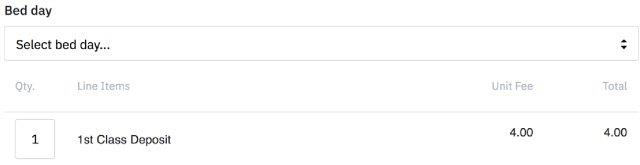
|
Fig 5.4.15: Bed Day (Web) |
To edit either the price, the quantity or to delete bed day charges, select the billable item to open the Edit Fee window.
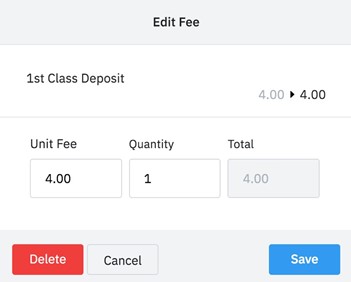
|
Fig 5.4.16: Bed Day Edit Fee (Web) |
In the Procedure sub-section, enter any procedures using the drop-down list.
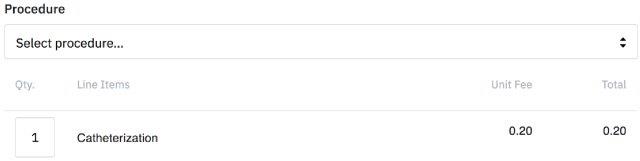
|
Fig 5.4.17: Procedure (Web) |
To edit the quantity or to delete bed day charges, select the billable item to open the Edit Fee window.
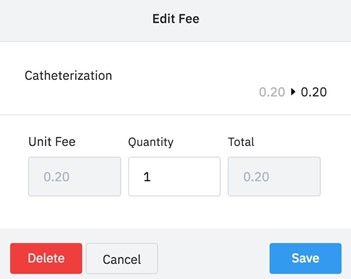
|
Fig 5.4.18: Procedure Edit Fee (Web) |
In the Comment section, you may enter an optional free-text comment that will appear in the claim for the claim adjudicator.

|
Fig 5.4.19: Claim Comment (Web) |
In the Amount section, review the subtotals and the total amount claimed. To edit the bypass fee manually (if applicable), use the “Enter custom amount” option.
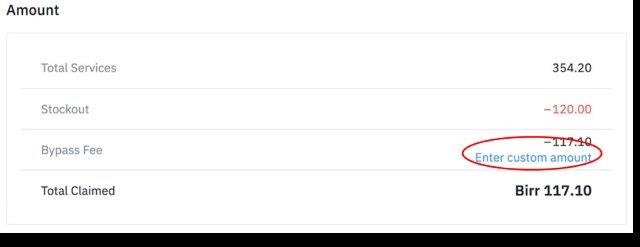
|
Fig 5.4.20: Amount Section (Web) |
If you entered a custom amount for the bypass fee, it will be reflected in the new total claimed amount.
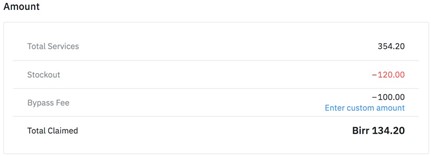
|
Fig 5.4.21: Amount with Custom Bypass Fee (Web) |
Once you have entered and reviewed all the information in your claim, use the Save button at the bottom of the screen to finish preparing the claim.
If you have missed any fields or made any invalid entries, a notification will appear at the top of the screen. Resolve any missing or invalid entries, and then use the Save button once again to finish preparing the claim.

|
Fig 5.4.22: Missing or Invalid Fields (Web) |
5.5. Preparing a claim without a checked-in member on the web app
If you are preparing a claim for a patient that doesn’t appear on the checked-in list, you may use the Create a New Claim button.
Because member details normally collected during the check in process are not available, you must start by entering the member details.
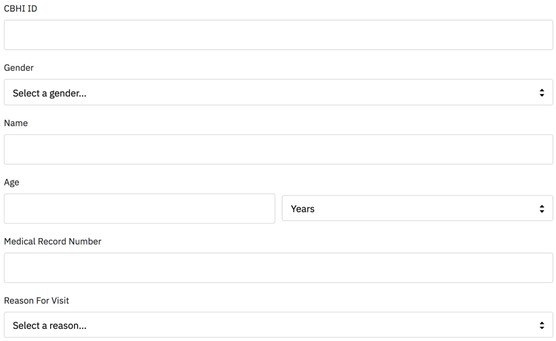
|
Fig 5.5: Claim Member Details (Web) |
From there, follow the same workflow as above for preparing a claim.
6. FACILITY HEAD APPROVAL
Once the claim preparer finishes preparing claims, they will appear for the facility head to review. The facility head can either approve a prepared claim - thereby submitting it for adjudication – or edit the claim before submission. Submission of a claim: this step, which is the final step from the provider’s side, is an official request by the health service provider to the payer/insurer to reimburse the provider for the services provided to the member. Thus submission is done by an authorized personnel of the health facility. To submit a claim from the provider to the payer, you need a pin/secret/unique code, and that code is equivalent to signature, given by the system admin.
6.1. Submitting and editing pending claims on the Android app
View the list of pending claims by selecting the Pending Approval button in claim submission home screen
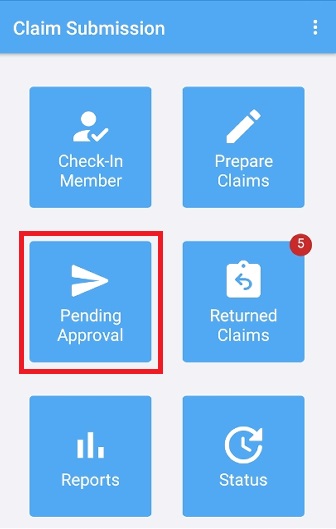
|
Fig 6.1.1: Claims Pending Approval (Android) |
Upon selecting Pending Approval, you will see a window requiring you to enter a PIN code to proceed. This is a security measure to ensure only the facility head or authorized personnel using the device can access the Pending Approval screen.
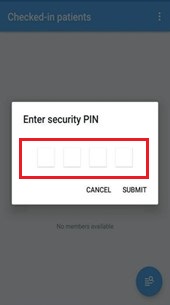
|
Fig 6.1.2: Enter PIN (Android) |
Enter your PIN code to proceed.
On the Pending Approval screen, you can either use the Submit All button at the bottom to submit all the prepared claims, or you can open individual claims for further review, edits, and individual submission. To approve multiple claims at the same time, you may use the checkboxes in the first column of the list to select as many claims as you would like to approve at once
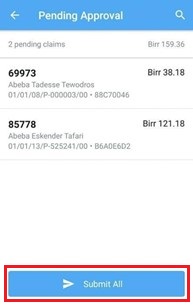
|
Fig 6.1.3: Pending Approval Screen (Android) |
If you choose to submit all claims, you will need to confirm your selection before submitting all pending claims. Select Submit to confirm your selection.
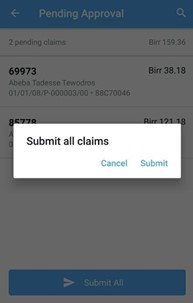
|
Fig 6.1.4: Submit All Confirmation (Android) |
If you would rather review claims individually, select a claim to review it in detail.
Once in the Review Claim screen, you can review the claim information. You also have an Edit feature to make any corrections to the claim prior to submitting it. To make edit, press the Edit button next to the claim information or data field you want to edit.
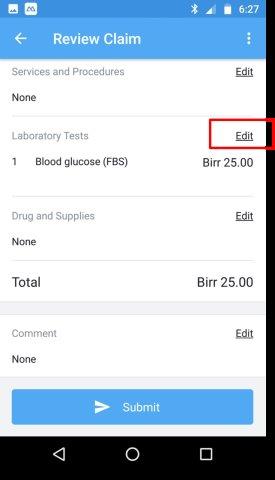
|
Fig 6.1.5: Review Claim (Android) |
After reviewing the claim and making any necessary changes, you can use the Submit button at the bottom of the screen to submit the individual claim.
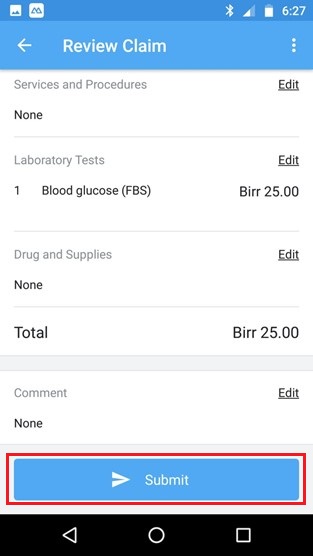
|
Fig 6.1.6: Review Claim (Android) |
Once the claim preparer finishes preparing claims, they will appear for the facility head to review. The facility head can either approve a prepared claim - thereby submitting it for adjudication – or the facility head can return the claim back to the claim preparer for correction.
6.2. Submitting approved claims and returning claims to the preparer on the web app
View the list of pending claims by navigating to the Submission tab and using the Pending Approval option.
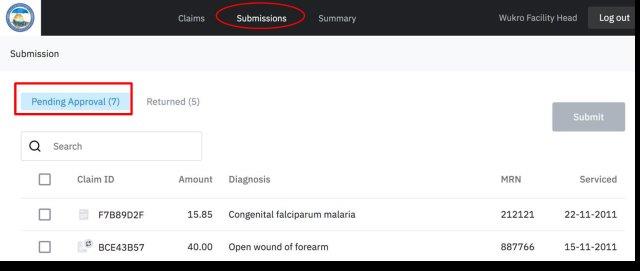
|
Fig 6.2.1: Submissions Pending Approval (Web) |
Click on a claim in the list to view the claim details of a specific claim as needed.
Once in the claim details, you can approve or return an individual claim using the options at the bottom of the screen. Use the Submit button to finalize your decision.
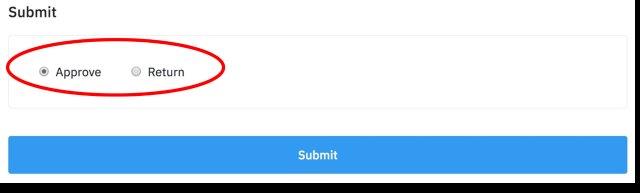
|
Fig 6.2.2: Approve or Return Individual Claim (Web) |
You will be taken back to the Submissions tab.
To approve multiple claims at the same time, you may use the checkboxes in the first column of the list to select as many claims as you would like to approve at once. When you have selected the claims you would like to approve, use the Submit button.
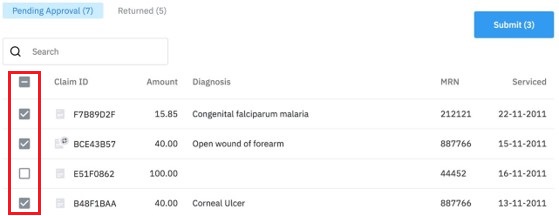
|
Fig 6.2.3: Submit Multiple Claims (Web) |
7. RESUBMIT A RETURNED CLAIM
When a claim is returned by an adjudicator, you will have the opportunity to correct claim information and resubmit the claim.
7.1. Resubmitting returned claims on the Android app
To view returned claims on the Android app, select the Returned menu option in the home screen.
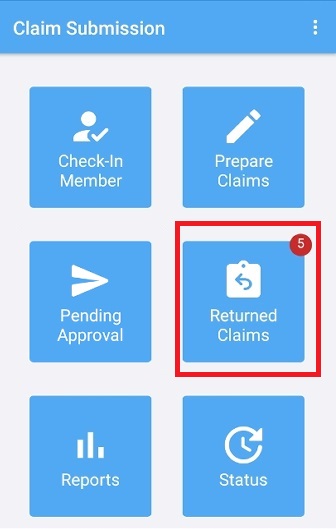
|
Fig 7.1.1: Returned Menu (Android) |
You will be prompted to enter your PIN code.
Once you have successfully entered your PIN, you will be taken to a list of returned claims.
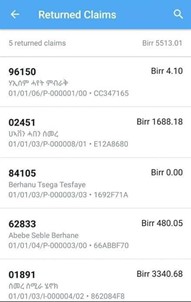
|
Fig 7.1.2: Returned Claims (Android) |
Select one of the claims in the list to open the Review Claim screen.
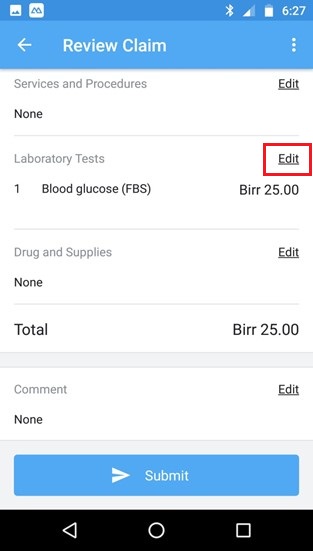
Review the claim information. Use the Edit Claim button to launch the edit claim workflow.
|
Fig 7.1.3: Edit Returned Claim (Android) |
You will then navigate through several screens to update claim information if needed.
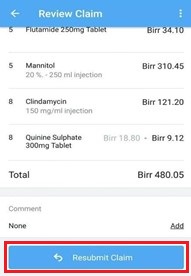
You will be required to enter a free text comment in the Comment box before you resubmit a returned claim.
Once finished, use the Resubmit Claim button to resubmit the claim.
|
Fig 7.1.4: Resubmit Returned Claim (Android) |
When a claim is returned by an adjudicator, you will have the opportunity to correct claim information and resubmit the claim. When a claim is returned by a facility head, you will also have the opportunity to revise and save the pending claim before submission to the adjudicator.
7.2. Resubmitting returned claims on the web app
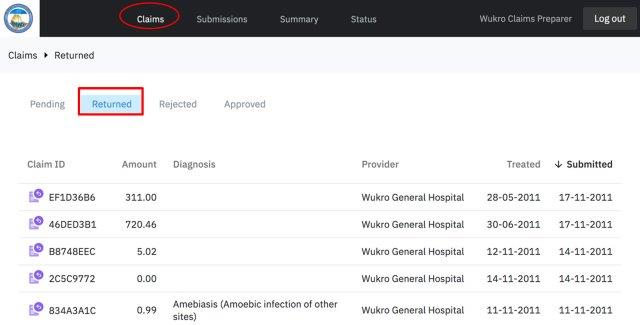
To view only the claims returned by the adjudicator on the web app, navigate to the Claims tab and use the Returned filter. There you will see the list of claims that have been returned, but you will not be able to edit the claims from this list.
|
Fig 7.2.1: Returned Claims (Web) |
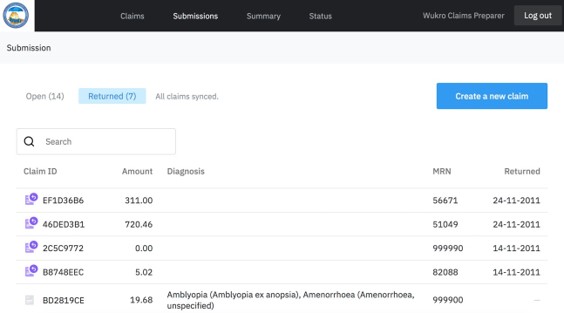
To view both submitted claims returned by the adjudicator and prepared claims returned by the facility head on the web app, navigate to the Submissions tab and use the Returned filter. From this list, you will be able to edit the claims as needed.
|
Fig 7.2.2: Returned Submissions (Web) |
Select one of the claims to open the claim details view.
Once in the claim details, you can see a comment in the claim history from the adjudicator (if one is provided) citing the reason for returning the claim.
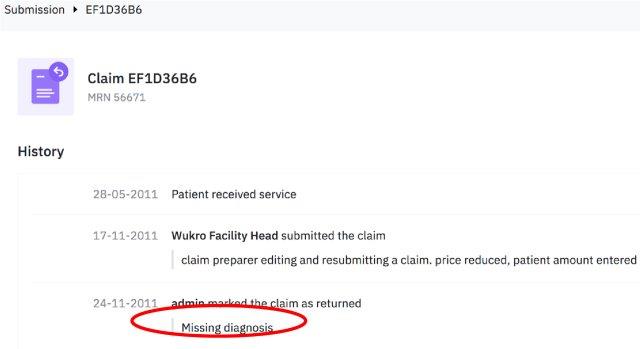
|
Fig 7.2.3: Approve or Return Individual Claim (Web) |
From there, you may correct, add, or change any information in the claim as needed.
You may also enter a new comment that will appear in the claim history.
Once you have finished updating the claim, use the Save button at the bottom of the screen to send the claim to the facility head for approval/resubmission.
See Section 6 for Facility Head Approval steps. You will repeat those steps again.
|
|
Fig 7.2.3: Approve or Return Individual Claim (Web) |
8. CLAIMS REPORTS
When a claim is returned by an adjudicator, you will have the opportunity to correct claim information and resubmit the claim.
8.1. Claims Summary Dashboard
Module(s): Facility Claims Review
Description: Shows high-level claims statistics, including the facility’s claims and associated birr amounts by adjudication state; filterable by date
Navigation Path: Log in as facility head user > Summary tab
To export excel file the summary statistics fill the date filter (start and end date) and press ‘export’. The export report is the ‘Facility reimbursement report’
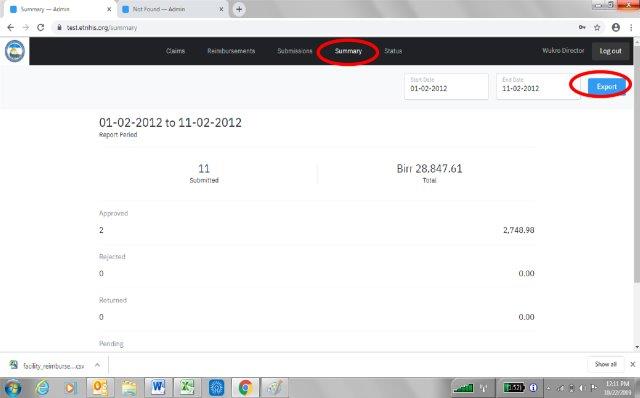
|
Fig 8.1: Claims Summary Dashboard (Web) |
1.1. Reimbursement Request report (from pending claims)
Module(s): Claims Adjudication; Facility Claims Review
Description: Export containing a claims summary and associated individual claim details; filterable by facility and date
Navigation Path: Login as facility head user > Claims tab > pending filter > (fill date filter as applicable) > Export report >
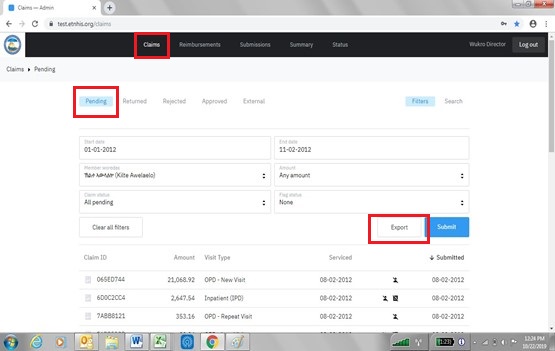
|
Fig 8.2: Reimbursement request report (Web) |
1.2. Accrued Amount Request
Module(s): Reimbursements
Description: High-level claims statistics showing the branch’s financial liability overall and per provider
Navigation Path: Login as branch user > Reimbursements tab > Accrued amount filter
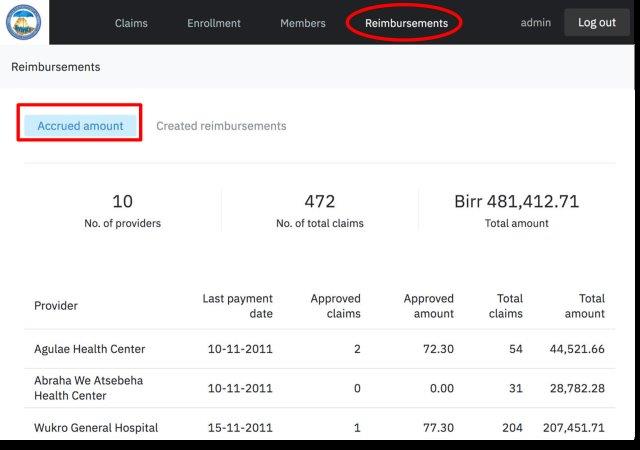
|
Fig 8.4: Accrued Amount Report (Web) |
9. TECHNICAL SUPPORT
9.1. Sync status screen
|
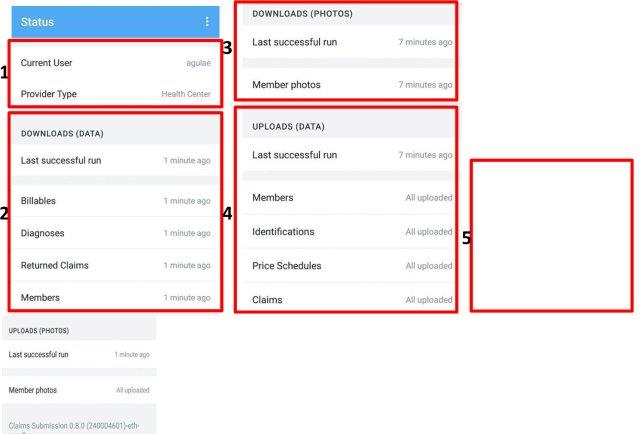
Fig 9.1: Sync Status Information |
Area 1: This area shows the current user logged into the device. It also shows the associated provider type.
Area 2: This area shows how long ago the device last successfully downloaded data from the server while syncing, as well as when specific sets of data were last fetched from the server.
Area 3: These areas show when the photos were last downloaded.
Area 4: This area shows how long ago the device last successfully uploaded data to the server while syncing, as well as when specific sets of data were last pushed to the server from the device.
Area 5: These areas show when the photos were last uploaded. This area also shows the application and Android version numbers.
9.2. Perform manual sync
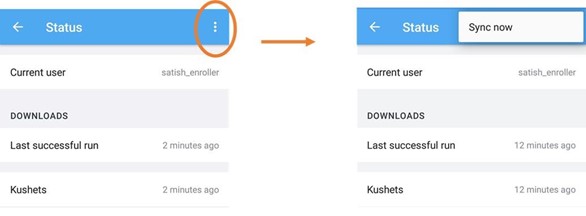
The application will sync regularly when connected. If you any reason you need to trigger the data to sync immediately, you may initiate a manual sync using the option depicted below.
|
Fig 9.2: Manual Sync |
CONTACT
For updates and corrections, contact mailto:sysadmin@etnhis.org