CLAIMS ADJUDICATION
ETHIOPIAN NATIONAL HEALTH INSURANCE SYSTEM
User Manual and Training Guide
DOCUMENT CONTROL
Created on: 5 July, 2019
Last updated on: 18 Oct, 2019
For updates and corrections, contact mailto:sysadmin@etnhis.org
ABOUT CLAIMS ADJUDICATION
Claims adjudication is a holistic term used for workflows that are carried out by the payer, it mainly includes claim processing (making an evidence based decision on the correctness of the claim submitted by the provider against the adjudication rules in place) and recording payment (reimbursement) to providers.
CLAIM ADJUDICATION IN ETNHIS
This manual is prepared for claim adjudicators, to help the user understand the web based claim adjudication module of the EtNHIS and use it as a guide, whenever reference is required. Although the web application is designed and built to be user friendly, the user manual will make it even simpler by providing a description of each and every button on the platform along with a chronological flow of processes so that a user can understand each and every step associated with a process. Nearly all pages of the claim adjudication platform are captured in this manual and all functionalities associated with the module are also included. In order to have a visual understanding of the process flow, each description of the process is aligned with screenshots from the claim adjudication web app. To have a good understanding of the process flow and the functionalities, users are expected to read the brief description of the process along with the screen shot of the web application.
CLAIM PROCESSING
On EtNHIS the claim adjudication process will follow three approaches those are 1) Automated review: this is the high-level review the system does on the nature of the claim. The system review will guide the adjudicator to further scrutinize on claims that are flagged by the system on the basis of the pre-defined rules. Some of the flagging reason for a claim can be the way the claim was prepared (identified and checked in claim versus manually checked in claim) the membership status of the beneficiary for whom the claim is prepared (expired or not), the referral status of the claim (whether the inbound referral is linked or not), etc. 2) Mass adjudication: certain percentage of the claims (the percentage to be determined by the responsible authority) can be subject for mass adjudication. The main goal here is to make judgement on the claims, that are not significant in terms of price (claims that wouldn’t jeopardize the financial health of the payer even if they are not correct) and claims that are not flagged by the automatic review. 3) Medical review: Certain percentage of claims (percentage to be determined by the responsible authority) will be scrutinized meticulously to look in to claim related compliance, in addition all returned and resubmitted claims will be manually reviewed to make sure that the required correction is done. If the information submitted via the EtNHIS platform is not sufficient enough to make decision, then the adjudicator has the right to mark the claim for an in person clinical auditing, also known as ‘on the spot audit’, and make the decision afterwards. 4) On the Spot audit: unlike the above three, this step is conducted outside the EtNHIS platform. The on the spot audit includes percentage of claim selected from the general submission plus suspicious claims from the medical review that were marked as claim requiring further investigation.
RECORDING PAYMENT (REIMBURSEMENT)
The EtNHIS adjudication module is equipped with a versatile payment recording functionalities. The reimbursement made to facilities can be recorded on this module periodically. The reimbursement follows the following procedure; The system user will create a batch of reimbursement for the facility out of the approved claims, the user can change the end date of the reimbursement based on the demand and the amount of money to be reimbursed. Once the user created a reimbursement the system will produce a finance summary/document showing the claims approved and their accounting category along with the corresponding payment amount to be reimbursed.
The payment request signed by reviewer and claim manager will finally be signed by the responsible authority to initiate payment. Using the payment request, as a supporting document, the payer (EHIA branch finance unit) will prepare a transfer letter and the money will be transferred to the health facility either by bank transfer or by cash transfer. Up on receiving the reimbursement, the health facility will issue a receipt for the paid amount, and the system user will record the payment detail for the batch of reimbursement made to the facility and wrap up the reimbursement process.
WHO ARE THE MAIN USERS?
The claim adjudication module will be used by all the responsible personnel in claim adjudication, mainly the EHIA branch claim adjudicators and claim department head (assuming that EHIA is the payer). Therefore, the claim adjudicators and finance focal person at the EHIA branch are the direct system users. Although the system users are from the EHIA branch, health facilities will also have clear visibility on the status of individual claims and the reimbursement made to their respective facilities, hence we can consider the health facilities as indirect system users.
HOW WILL THIS APPLICATION HELP?
The manual provides screen by screen description of the claim adjudication module; and it is expected to be helpful in assisting claim adjudicators carry out their activities such as processing claims, creating reimbursement and generating report.
1. GETTING STARTED
The Claims Adjudication application is available on the web application only. You will log into the web app using your user account credentials. To access the web app, use the following link https://test.etnhis.org (for practice only) and https://etnhis.org (for entering actual transactions).
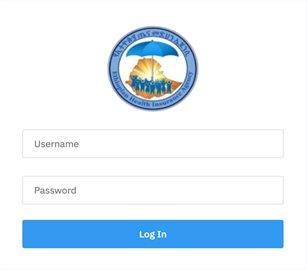
1.1. To begin, enter your username and password on the login screen.
|
Fig 1.1: Login Screen |
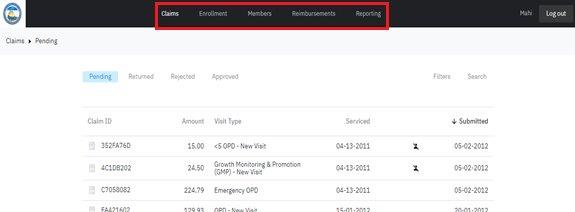
1.2. Once logged in, you are taken to the claims list view. On the top of the screen, different tabs provide access to different views and options. By default, the Claims tab is selected
|
Fig 1.2: Default Claims Tab |
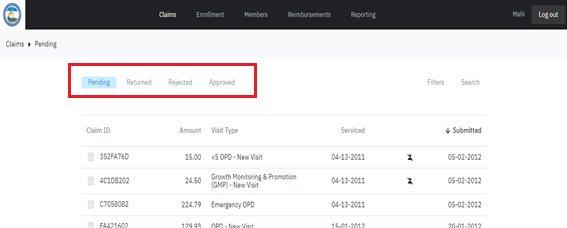
1.3. Within a tab, different filters provide you options to view the information in a variety of ways. In the Claims tab, for instance, you can filter by the adjudication status of the claims using the claims status filters.
|
Fig 1.3: Claims List Filters |
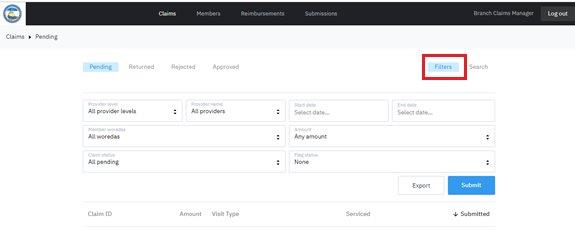
1.4. Additional advanced filtering option displays when you select the Filters option. Use any of the filter options provided and then use the Submit button to see them reflected in the claims list, the same rule applies to the other sub-tabs (the filters based on adjudication status)
|
Fig 1.4: Additional Filters |
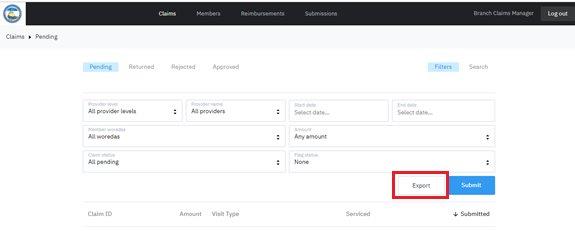
1.5. If there is a need to export report of the claims filtered using the advanced options, click Export button to generate the desired report file. the same rule applies to the other sub-tabs (the filters based on adjudication status)
|
Fig 1.5: Additional Filters |
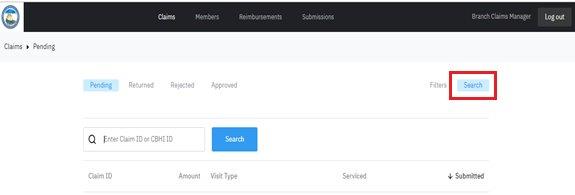
1.6. A search filled will be displayed when the search button is selected. Type the claim ID or CBHI ID on the space provided and press the button to search and locate a single claim. the same rule applies to the other sub-tabs (the filters based on adjudication status)
|
Fig 1.6: searching a claim |
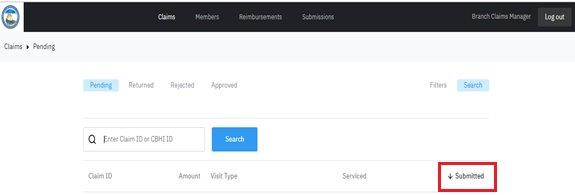
1.7, The claim list view can be sorted ascendingly or deceivingly by selecting the columns heading by default the submitted column is sorted in a descending order, selecting the button will reverse the sorting order. the same rule applies to the other sub-tabs (the filters based on adjudication status)
|
Fig 1.7: sorting the claim list view |
2. REVIEWING A CLAIM
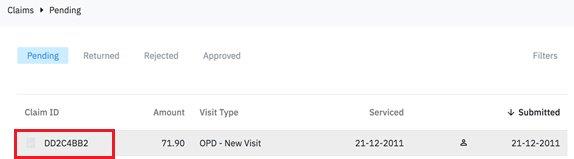
2.1. Once you used the filtering options to adjust the list of claims, or used the search option to identify a claim to review. Click on the claim to open it.
|
Fig 2.1: Select Claim to Review |
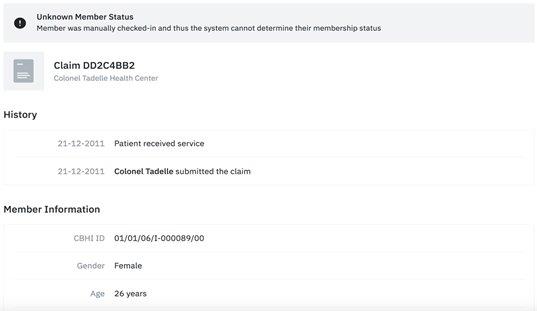
2.2. When the claim opens, you see a detailed view of the claim. Starting at the top, you may see notifications like the Unknown Member Status, which denotes a member check-in manually without system validation of the current membership status. You see the claim ID and the originating provider. Following that, the History section shows you all previous actions taken related to the claim. The Member Information section displays member data collected during check-in and/or member enrollment.
|
Fig 2.2: Claim Details – History and Member Info |
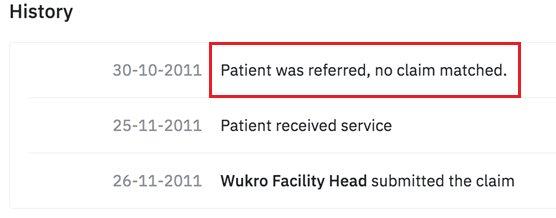
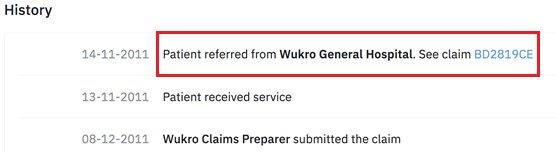
2.3. If a claim involves a referral, the History section will include a line with either a link to the associated referral, “see claim xxxx” or a note saying that the referral is not yet linked to this claim, “no claim matched”
|
|
Fig 2.3: Claim Details – Referral Linkage |
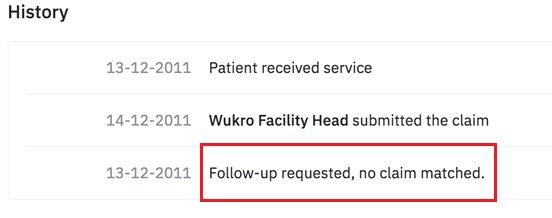
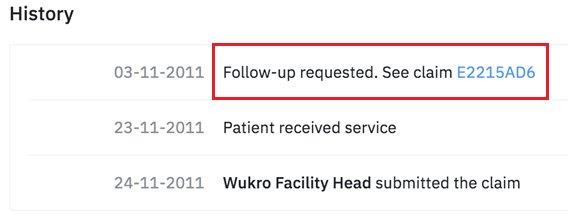
2.4. If a claim involves a follow-up, the History section will include a line with either a link to the associated follow-up, “see claim xxxx”, or a note saying that the follow-up is not yet linked to this claim, “no claim matched”.
|
|
Fig 2.4: Claim Details – Follow-up Linkage |
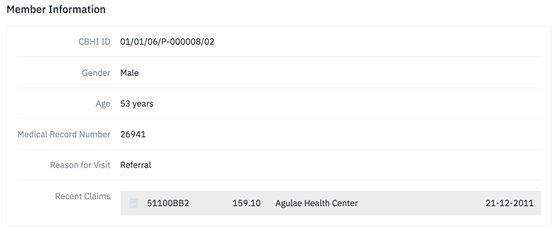
2.5. If the member has received care recently, links to the recent claims associated with those visits will appear under the Recent Claims subsection. Click on any of the claims in this section if you wish to see the claim details.
|
Fig 2.5: Claim Details – Recent Claims |
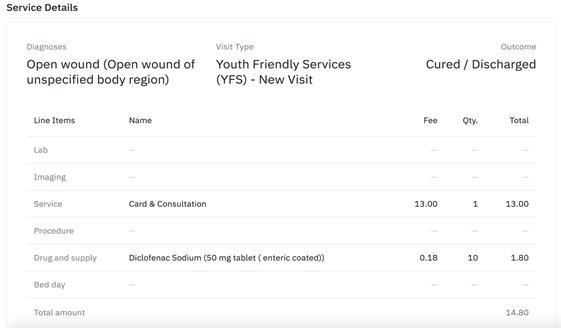
2.6. In the Service Details section, you will see charges, subtotals, and the total amount of the claim calculated.
|
Fig 2.6: Claim Details – Service Details |
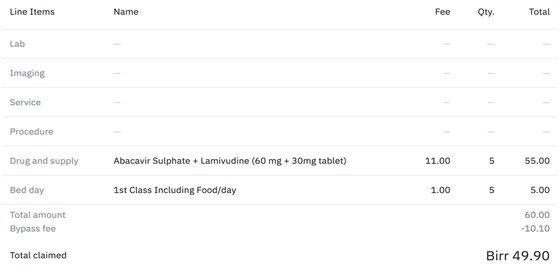
2.7. If the claim is a hospital claim and it contains a bypass fee, you will see the bypass fee amount and the amount requested for reimbursement delineated in the calculations.
|
Fig 2.7: Claim Details – Bypass Fee |
3. ADJUDICATING A CLAIM
After reviewing the claim details and any other related claim information necessary to make a decision about the claim, you will then need to document the adjudication decision.
3.1 Adjudication Options
3.1.1 Locate the Adjudication section at the bottom of the claim details screen. You have three adjudication options: (1) Approved, (2) Returned, and (3) Rejected. However, if the information provided is not sufficient enough or is found to be bogus/suspicious, you can mark the claim for on the spot clinical auditing by sliding the highlighted button.
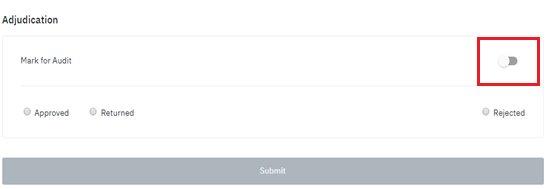
Fig 3.1.1: Adjudication Section
3.1.2 Select the Approved button to document that the claim is approved. Once Approved is selected, the Submit button will turn blue and you can use it to finalize the approval.
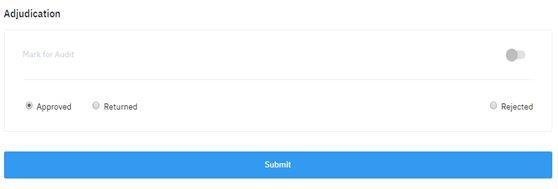
Fig 3.1.2: Approved
3.1.3 Select the Returned button to document that the claim needs additional information before you can approve it. Once Returned is selected, a drop down option and a text box will appear to document the reason for returning the claim. You will not be able to use the Submit button to finalize the return unless you have chosen a reason from the dropdown options. This explanation will appear to the claim preparer at the submitting facility.
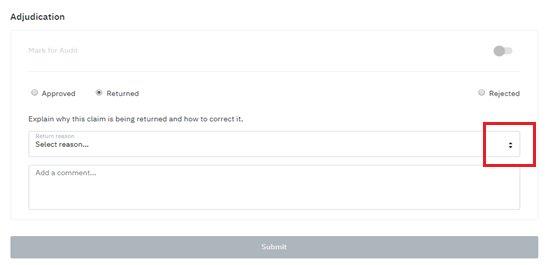
Fig 3.1.3: Returned
3.1.4 Select the Rejected button to document that the claim is rejected and will not be paid. Once Rejected is selected, a dropdown menu and a text box will appear to document the reason for rejection. You will not be able to use the Submit button to finalize the rejection unless you have chosen a reason from the dropdown options.
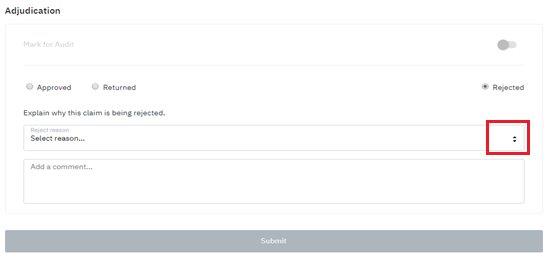
Fig 3.1.4: Rejected
3.2 Finding claims following adjudication
3.2.1 To locate a claim after documenting an adjudication decision, return to the claims list.
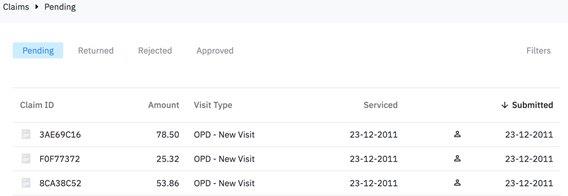
Fig 3.2.1: Claims List Redux
3.2.2 Once back on the claims list screen, you can use the status or other filters to locate the claim. An adjudicated claim will show up under the respective status filter.
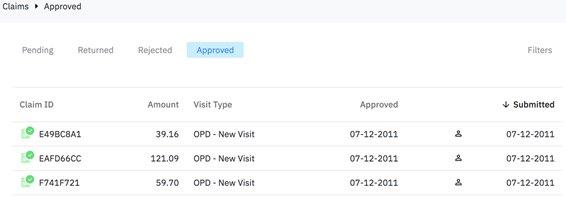
Fig 3.2.2: Approved Claims
3.3 Reviewing resubmitted claims
3.3.1 A claim that is resubmitted after being returned to the health facility will appear again under the Pending filter in the claims list. The icon indicates it is a resubmitted claim.
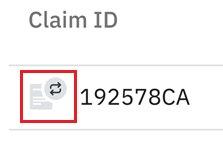
Fig 3.3.1: CBHI ID
3.3.2 Select the claim to open the claim details.
3.3.3 Included in the claim history will be a note about the change made by the facility.

Fig 3.3.2: Resubmission Comment
3.3.4 Review the claim details, document your adjudication decision, and then use the Submit button to finalize it.
3.4 Understanding claim icons and flags
3.4.1 Icons and flags in the claims list view provide valuable at-a-glance indicators about a claim. Some of the most important ones are highlighted below.
3.4.2 Pending Claim

Fig 3.4.1: Pending Claim Icon
3.4.3 Returned Claim

Fig 3.4.2: Returned Claim Icon
3.4.4 Rejected Claim

Fig 3.4.3: Rejected Claim Icon
3.4.5 Approved Claim

Fig 3.4.4: Approved Claim Icon
3.4.6 Resubmitted Claim

Fig 3.4.5: Resubmitted Claim Icon
3.4.7 Inactive or Deleted Member

Fig 3.4.6: Inactive or Deleted Member Flag
3.4.8 Unconfirmed Member

Fig 3.4.7: Manually Entered Claim Flag
3.4.9 Inbound Referral Not Linked

Fig 3.4.8: Inbound Referral Not Linked Flag
3.4.10 Bypass Fee Below 50%

Fig 3.4.9: Bypass Fee Below 50% Flag
4. ENROLLMENT TAB
4.1. Once logged in, you are taken to the claims list view. On the top of the screen, different tabs provide access to different views and options. By default, the Claims tab is selected. In order to access the enrollment statistics, click the enrollment tab as it is highlighted below.
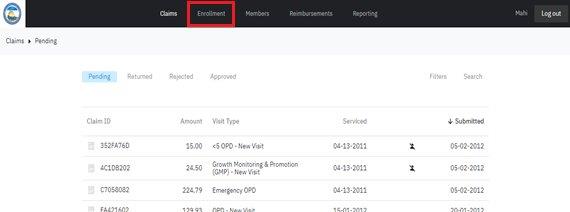
|
Fig 4.1: Default Tab |
4.2. Once the enrollment tab is selected, different filtering options will be displayed to filter and see the summary statistics on Member, Beneficiary and Payment.
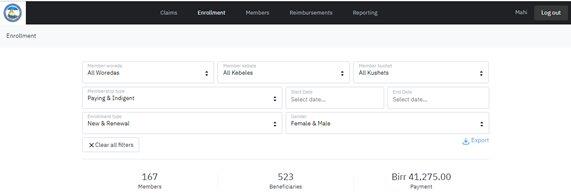
|
Fig 4.2: Members Tab |
4.3. The Export button, as it is highlighted below, will allow the filtered options to be downloaded as a CSV file. If there is a need to change the filtering options, you can clear the filters using the clear filter button.
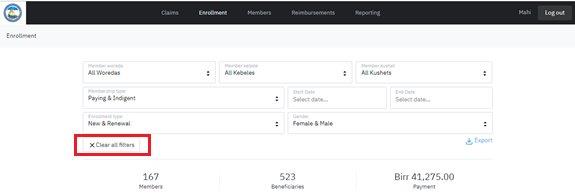
|
Fig 4.3: Members Tab, clearing filters |
4.4. The payment summary statistics will further be disaggregated, and displayed at the lower half of the enrollment tap page.
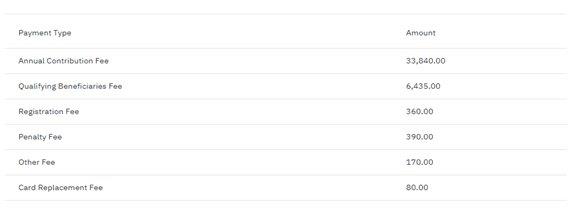
|
Fig 4.4: Members Tab, payment details |
5. MEMBERS TAB
5.1. Once logged in, you are taken to the claims list view. On the top of the screen, different tabs provide access to different views and options. By default, the Claims tab is selected. In order to explore and identify a member click the member tab highlighted below.
|
|
Fig 5.1: Default Claims Tab |
5.2. Once the member tab is selected, different search options will be displayed to search and identify a member, by default searching by CBHI ID is selected.
|
|
Fig 5.2: Members Tab |
5.3. In order to search a beneficiary using MRN number, the provider (health facility) has to be selected in advance, since MRN number is facility specific
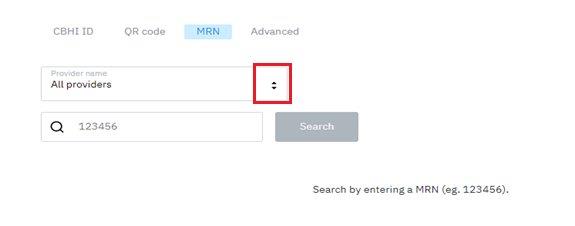
|
Fig 5.3: searching by MRN |
5.4. If you are unable to identify the beneficiary using the above three search options, use the advanced option by selecting the beneficiary’s location.
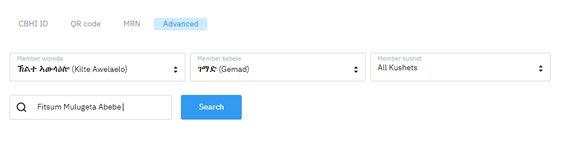
|
Fig 5.4: Advanced search option |
6. REVIEWING A MEMBER [TO BE COMPLETED]
6.1. Once you used the searching options to identify a member. Click on the name of the member/beneficiary to open it, as it is highlighted below.
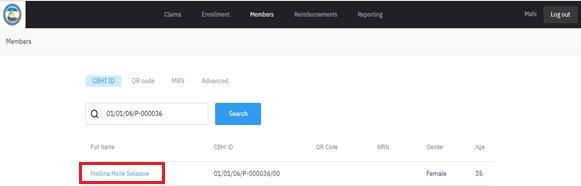
|
Fig 6.1: Select member/beneficiary to Review |
6.2. When you open the beneficiary you will see a detailed view of the beneficiary’s demographic and enrollment status (whether the beneficiary is active or inactive)
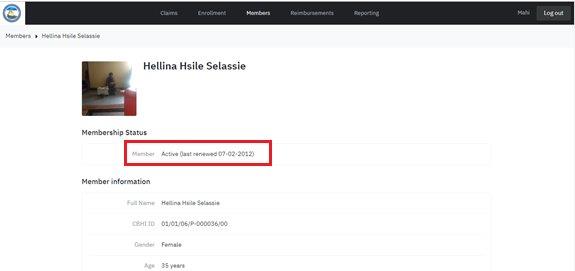
|
Fig 6.2: Beneficiary Details –Member Info |
6.3. As highlighted below the membership status of the entire household and the beneficiary being explored is displayed on the detail page of the beneficiary. If the entire household is inactive you will see notification at the very top of the beneficiary’s detail page.

|
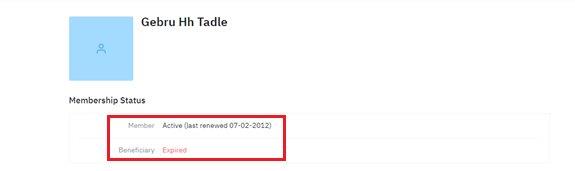
|
Fig 6.3: Claim Details – Referral Linkage |
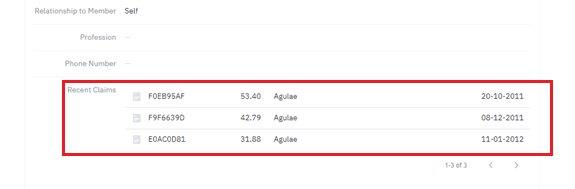
6.4. On the detail page of the beneficiary you will also see recent claims and additional beneficiary that are under the same household.
|

|
Fig 6.4: Claim Details – Follow-up Linkage |
7. REIMBURSEMENTS TAB
Once claims have been adjudicated, those you have approved become eligible for reimbursement. You will group approved claims into batches and enter payment details in order to document the reimbursement of these claims.
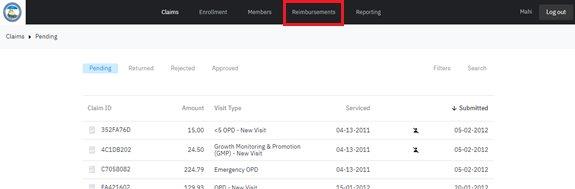
7.1, Once logged in, you are taken to the claims list view. On the top of the screen, different tabs provide access to different views and options. By default, the Claims tab is selected. In order to access the reimbursement workflow, click the reimbursement tab as highlighted below.
|
Fig 7.1: Default Claims Tab |
- Reviewing liability data
Select the Reimbursements tab on the toolbar and you will land on a summary screen that displays data about the accrued value of outstanding claims.
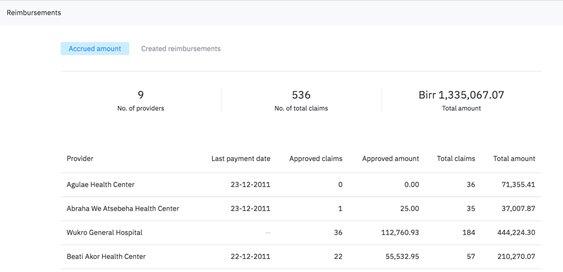
Fig 5.1.1: Accrued Amount Summary
Summary information appears toward the top, and then provider-level information appears in the table underneath.
To see more detailed information about a specific provider, click on one of the providers in the table. You will be taken to a summary view of claims information related to that individual facility.
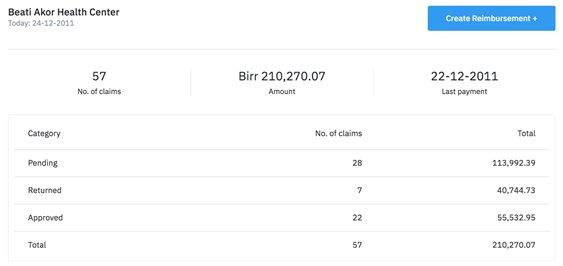
Fig 5.1.2: Facility Summary
Creating a reimbursement
If you need to create a reimbursement, you can do that directly from the facility summary view. Use the Create Reimbursement + button to start creating a new batch of claims for reimbursement.
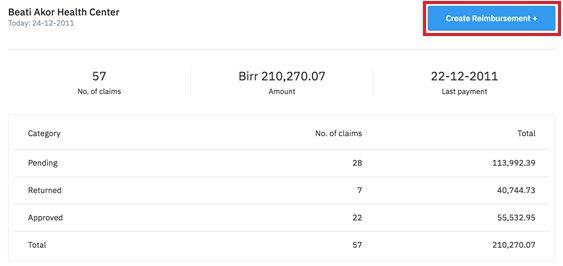
Fig 5.2.1: Edit MRN
A window launches where you can choose the date range for creating the reimbursement batch.
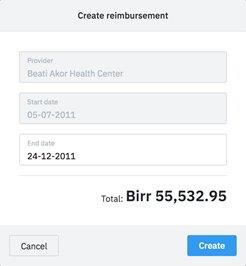
Fig 5.2.2: Create Reimbursement
When you adjust the end date, the total amount changes to reflect the value of the claims within the date range.
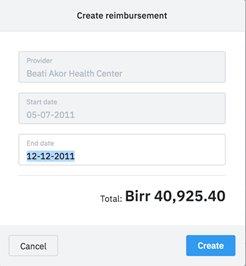
Fig 5.2.3: Reimbursement Date Range
Use the Create button to create the new reimbursement batch.
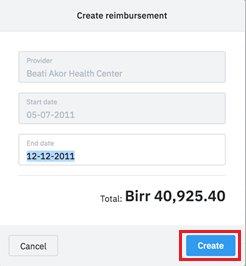
Fig 5.2.4: Create Button
Completing a reimbursement
After creating the reimbursement batch, you will be taken to the Created Reimbursements screen. You may also navigate there via the Reimbursements tab.
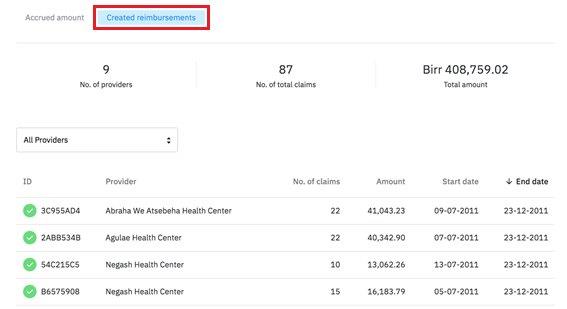
Fig 5.3.1: Created Reimbursements
After creating the reimbursement batch, you will be taken to the Created Reimbursements screen. You may also navigate there via the Reimbursements tab. The gray document icon indicates a pending/incomplete reimbursement. A green checkmark icon indicates a finalized reimbursement
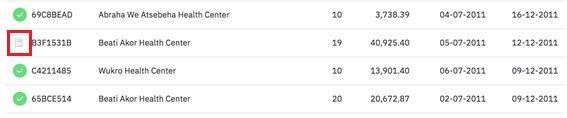
Fig 5.3.2: Pending Reimbursement
Click on the line item for the recently created batch and the batch details open. This batch is marked Incomplete and the date is marked Pending until the payment info is entered.
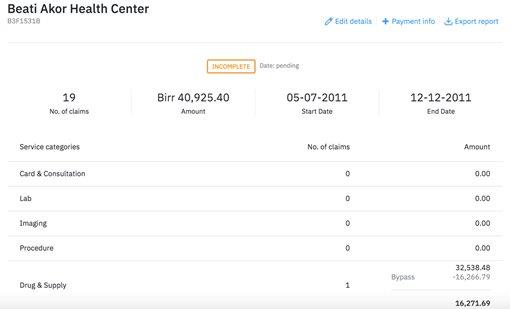
Fig 5.3.3: Created Reimbursements
Use the Edit Details button to edit the date range of the batch if need. Once you enter payment information and the batch is finalized, you will no longer edit these.
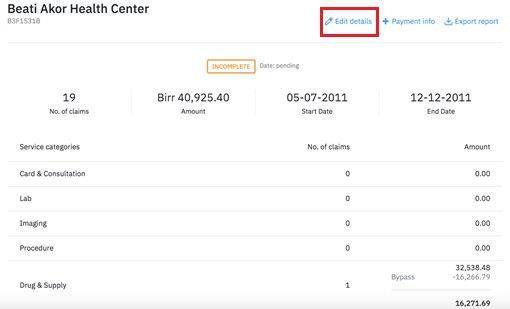
Fig 5.3.4: Edit Reimbursement Details
Use the Export Report button to generate an offline file containing the reimbursement request information for this this batch of claims.
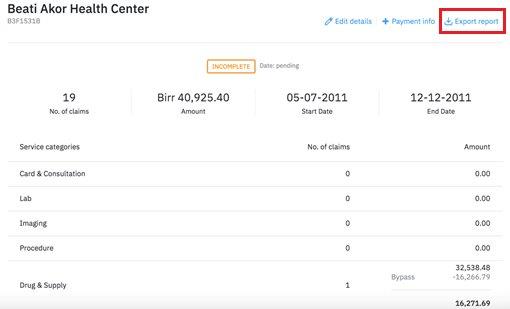
Fig 5.3.5: Export Reimbursement Request
Use the Payment Info button to launch a window where you will enter the payment details associated with payment of this reimbursement batch.
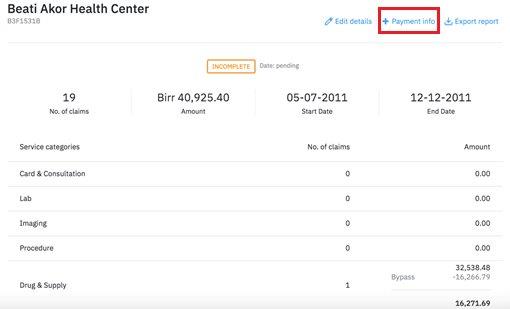
Fig 5.3.6: Edit Reimbursement Details
If payment was made via bank transfer, then choose the Bank Transfer option and enter the remaining detail on the Add Payment Info screen.
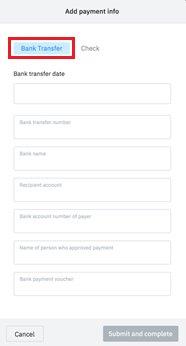
Fig 5.3.7: Add Payment Info – Bank Transfer
If payment was made via check, then choose the Check option and enter the remaining detail on the Add Payment Info screen.
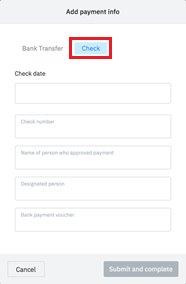
Fig 5.3.8: Add Payment Info – Check
7.2 Once payment info is entered, the reimbursement is considered complete and details are no longer editable. You can still generate an export of the data if needed.
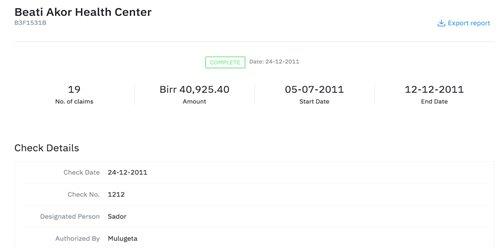
Fig 5.3.9: Completed Reimbursement
8. REPORTING TAB
8.1 Once logged in, you are taken to the claims list view. On the top of the screen, different tabs provide access to different views and options. By default, the Claims tab is selected. In order to generate reports, click the Reporting tab as highlighted below.
|
|
Fig 8.1: Default Claims Tab |
8.2 Once you access the reporting tab, three reporting categories will be displayed namely utilization, contribution and enrollment reports, by default the contribution reporting will be selected.
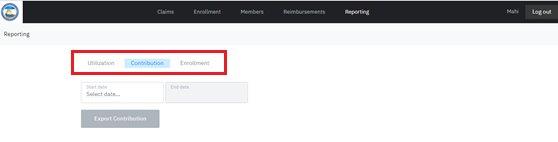
|
Fig 8.2: Reporting categories |
8.3 In order to generate report on the contribution collected specify the start date and end date for the reporting period and select export contribution. The report will only be generated if the start and end date is specified (when the export contribution button is changed to blue).
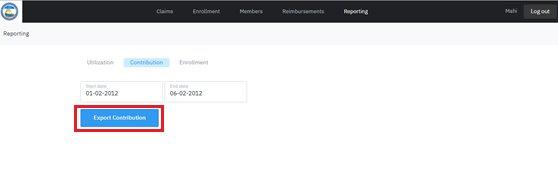
|
Fig 8.3: exporting contribution report |
8.4 The same way utilization report can be generated by selecting utilization from the three categories. The start date and end date has to be specified first (the ‘Export utilization’ button has to turn blue), to generate report on Utilization.
8.5 To generate an enrollment report, the enrollment period has to be selected first and the report period specified.
8.6 Once the enrollment period is selected and the reporting period is specified, the Export enrollment button will be changed to blue and you can download the report.
CONTACT
For updates and corrections, contact mailto:sysadmin@etnhis.org